Showing posts with label blocks. Show all posts

Thursday, August 23, 2012

Chained 5 Patch Block


I could fill a really long post with a smorgasbord of things that have been going on life-wise lately! Quilting-wise, eh, not so much. It's been a bit slow around here, but I did get a new 1/4" piecing foot and two new quilting books, so that's... somethin... :P

I got the new quilting foot because the old one I had seemed like it wasn't made very well and the guide shook quite a bit, making it not perfectly accurate. It also liked to fold back my fabric, instead of letting it feed through smoothly. The new foot works much better, which will be really helpful in making this quilt for my sister's birthday! (She doesn't read my blog. :) )


I found the block, and tutorial on the Quilter's Cache. I had a lot of fun time going through their collection! I would suggest using their tutorial for this block (duh, lol - I hope this post doesn't come off as a tutorial of a tutorial), as it was pretty easy to follow, but I thought showing you guys photographs might be helpful while going though it. Their tutorial has some computer/graphic images, and text, but for me real photographs are always a big plus! So here we go!


Cutting
 Color 1:

Color 2:

Color 3:

Color 4: (Eventually you will cut this 18" strip into smaller pieces.)

Sewing
Step 1: Sew the following blocks together, and then slice it in half.

Step 2: Now sew these blocks together, and slice it in half.

Step 3: Sew these blocks together, slice again!

Step 4: Cut your 18" strip into the following sizes:

Step 5: Now you only have a few pieces left - sew them together as shown below on the left. Grab your pieces from step 3 and sew them together with the strip below. The resulting block will need two white (color 4) 2.5"x5" pieces sewn to the top and bottom.


Arrange your strips as shown in the block layout and you're done! Hopefully that made sense and was easy to follow - like I said, I just wanted to show you guys photos of what I did. I'm not the greatest at explaining things, so I'd definitely refer to the original tutorial. :)

Umm, yea - so I'm a nerd (aren't we all? I mean, c'mon, we have quilting blogs, hehe), and a bit obsessive about making sure this quilt will look really nice for my sister, so I laid out a section of it in photoshop. (Hey, I gotta do something on my lunch break!) I wanted to be sure I was going to like the colors/arrangement. It's not completely accurate, but it helped me make the decision to use brown as the "anchor" color.


I need to make six blocks a week to finish it in time for her birthday! I think I can, I think I can!!


Well guys, I've got a lot of crap going on for the next 3-4 weeks - lots of travel and wedding prep! I sort of saved everything until the last minute, that's just how I be. I'm going to try to squeeze in sewing time wherever I can to take my mind off veils, music selections, decorations, portapotty's (we are so classy) and all that craziness. Thanks for stickin with me while I'm a bit blog-absent! :D

PS AQS in Grand Rapids this weekend! I'm going on Saturday!! Is anyone going?

PSS EZ Dresden deadline is a week away! All I have left is the binding! :) :) Double smileys.

Friday, August 17, 2012

Story behind the name and a birthday quilt


It's been a very busy week for me! I've spent almost every night this week researching and shopping for a new car. I'm really excited about finally making a purchase, but it doesn't make for a very interesting story, so I'll just summarize by saying that I haven't been doing much sewing!

Okay, how about a mini-story that is quilting related? Like, how I came about choosing my blog name. When I made my first quilt and everyone in my family found out, all of a sudden I was hearing a lot of, "Make me a quilt!" And that's pretty much it. :)

One person that wants a quilt that I haven't gotten around to yet is my sister. I've been putting it off because I want her quilt to be perfect... Her birthday is coming up in September, and maybe it's crazy to take on a new project with a month left until my wedding, but I'm going for it!


I LOVE this set of fabric,  I mean.. I really love it. I have been staring at it for a week, folding and stacking the fabrics, thinking about what I want to do with them. I can't take credit for how well these colors go together - ahhh, I totally stole this color scheme from Rachel, (Stitched in Color), who put together an awesome "blogger bundle" called "Berry Picking" for Pink Castle Fabrics. Go buy the bundle because it's perfect! :D

I would have bought this bundle, but I had to stop myself... I decided to look through my stash and see if I had anything that would work, and then use the gift certificate I won to purchase additional fabrics to complete the set as best I could. I still might snap up that Berry Bundle - I just need to cool my jets on the ol fabric budget for a minute!


Now I know why everyone loves Flea Market Fancy so much.. the fabric is even prettier in person, and I'm sure I'll be buying some more of the brown in the future, it's gorgeous!


So back to the quilt I'm going to make from these fabrics. My sister is a more "traditional" type of person. She really likes vintage stuff and "old-fashioned" decor. I don't think she'd like anything wonky or really modern. The colors in this fabric set might even be a little too bright for her taste, but I've picked out a really cute block pattern that has a "classic"/traditional look to it that I think she'll like.

In my next post I'll show you the block and a step-by-step on how to make it. Here's a preview!


Thanks for stopping by! :)

Tuesday, July 17, 2012

1st Mario Block & The Discovery of Starch


Cut To Pieces

Summer is a hard season for sewing. There is so much more going on with family and friends, so much more temptation to be outside enjoying the sunshine that is such a rarity in Michigan after October.  A lot of my weekends are reserved for having people staying with us, or for traveling to visit family. This is a wonderful thing, I just wish I felt like I have made more progress this month!

Another wish of mine would be for some rain. In the city I live in, we haven't had rain since May. Okay, we got 1/2" of rain in June, but that is nothing! And no rain so far in July. Temps are soaring into the 90's on a regular basis. My grass is dead, my plants are thirsty - come on rain! It'd sure give me a good excuse to spend a large chunk of time in the sewing room. ;)

Last night I started working on my Mario quilt! My fiance and I are big time Mario fans - it's the only game we play on the Wii together. Making this quilt is something I've been really excited about. After making the first block, I'm a little.. worried. Here is how the process of making my first Mario block went down. If you aren't participating, it might not be that interesting, but you might skip down to the part about "cutting the squares", where I talk about starch!

(Wow, this turned out to be a long post!)

Supplies
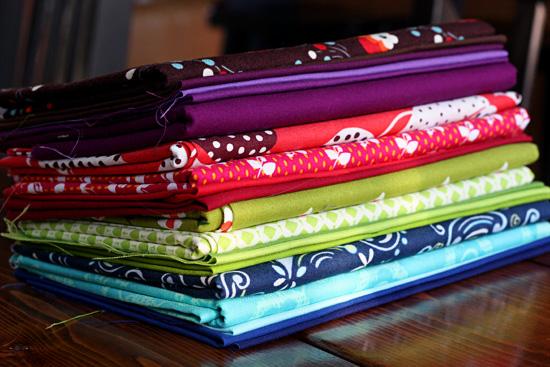
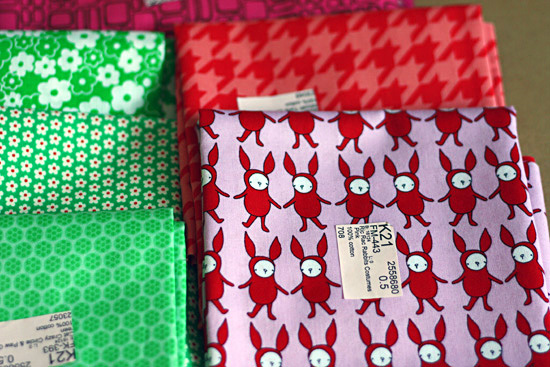
I bought most of my fabric supplies online, but I didn't pick up the fat quarter pieces, because I knew I was going to get this big package of Kona layer cake sized solids in the mail, from a swap I participated in. This is such a treat! I just want to stare and sort and re-sort these babies. So pretty. :) I was thinking I'd be able to pull some of these to make up for the fat quarters I didn't buy.


I couldn't find the wash out stabilizer that Angela recommended for using with this quilt a long. I ended up buying the lightest weight Pellon fusible they had at JoAnn's. This is supposed to  make sewing these tiny 1.5" square blocks together a breeze. Unfortunately I didn't have that experience, which I'll talk about more further down the post. I am really worried that this quilt is going to be... Very heavy. And very stiff.  Hmm!

If this quilt gets finished, I am toying with the idea of using something besides batting for the center, to cut down on the weight. Flannel? Has anyone tried using an alternative to batting, and what was your experience? By the time this quilt is finished, it will be winter, but I don't want to get smothered by video game characters in my sleep! Lol.

Cutting the fabric into squares
1.5" squares need to be very accurate. I recently heard someone say they use starch every time they quilt, to get a very crisp, flat fabric when ironing, and to stiffen it up for accuracy when cutting and sewing. I figured this would be the best time to try it out, because of the tiny pieces I'll be using, so I picked up a can at JoAnn's.


I cut small sections (like 9 or 12 inches wide) off my yardage, so I wasn't cutting 1.5" strips off a 3 yard stretch of fabric. I would lay the small section out on the floor and spray it down with starch, holding the can about 6" - 8" from the fabric. I didn't soak it, I just did a light, even spray. I don't know what starch will do to the carpet, but I don't really care about mine personally, as it's already somewhat trashed as a result of being in the sewing/craft room!

I would flip the fabric over and iron the other side that I didn't spray. I don't know if it matters, it just made me a little nervous to press an iron onto the wet side. It probably doesn't matter. Press the iron down, but try not to "push" the fabric around, because the starch will stiffen the fabric into a stretched position. Just press.


Cutting was definitely easier with this starched fabric! I was really impressed. I plan on continuing to use the starch for this quilt, I think it really helped with the accuracy of my block cutting. But boy, it took a LONG time to cut these squares! And cutting is my least favorite part of quilting. I just may take a day to cut a LOT of the squares out all at once so I can just get it over with. :P


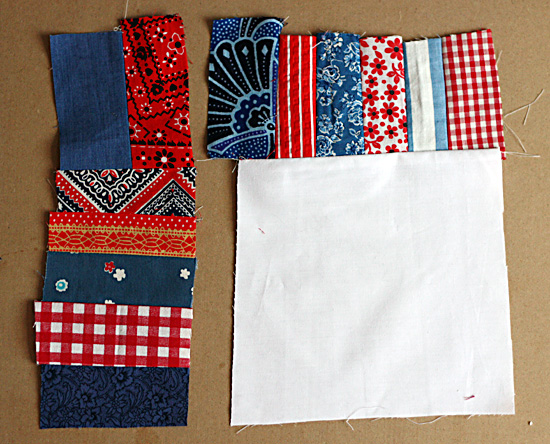
Layout out the squares
This was the fun part, though it took a lot longer than I thought it would. Make sure to double check your work, because it's easy to place the wrong square down - I did it half  a dozen times! I only ended up laying out as many blocks that would fit on the width of interfacing I had.


I drew a grid onto the stabilizer this time, but I might not do it again. If you draw one straight line down the center, and then one perpendicular line across the width, you'll have your start lines and you can work from the center out. Everything should keep square if you get the first blocks right.Though I'm not sure I should be giving this advice, as you can see the white gaps between the blocks above!

Fusing the squares to the stabilizer
Ugh. This was.. almost disastrous. I've used interfacing before, but not in this way, with all these tiny pieces. I should have followed the directions more carefully.

The directions say to get another large piece of fabric wet and lay it on top of your work. I didn't do that because I was afraid it would mess up the squares and move them out of place. I now actually think it might help keep them in place, but I could be wrong.

I just took a spray bottle and dampened my squares. Whoops! This made the squares curl up on the edges - all my hard work was compromised! I had to be extremely careful with the iron to flatten out the squares without shifting them.. it was really hard. And it didn't turn out "perfect", but it was pretty close to perfect. But I wanted it to be perfect. You know how that goes - it's our hobby, we want to get better at it, we want to be proud of what we are doing. The little gaps between the squares drove me crazy. But it's okay. What's that saying? Keep calm and quilt on...

Sewing the rows
Halleluiah! Finally, an easy step. Right? Not so much. For the first round of sewing, yes, it's easy. The interfacing wants to fold along the rows, so just fold, sew, repeat.

Shave just enough of the seam allowance off to separate the interfacing and you are ready to sew the other direction.

The other direction turned out to be SO HARD! My sewing machine did NOT like sewing through all those layers of fabric and more fabric and interfacing and more interfacing. I needed my walking foot, but as that doesn't have the 1/4" edge on it to make sure my seam allowance is accurate, I couldn't really use it. The result was that my rows got really wobbly!

Finished block

I am disappointed. I can't use this interfacing again, that's just not going to happen. It's too hard to sew through everything on my machine with enough accuracy to make me satisfied. And the block is very stiff. It takes a long time to put this block together, so to end up with wobbly rows and a block that is so heavy - I need to make some changes.  

I'm going to try to sew the next block with NO interfacing. It might be really difficult. I'm going to stay positive! I want a finished quilt that has straight rows and doesn't weight 30 pounds, so I think this is the solution. The wash out interfacing is an option, but I'd have to find it (which is apparently kind of difficult) and it's expensive. So it's probably not really an option.

Another possible outcome is that these blocks might turn into throw pillows. Sigh.. On the bright side, I'll have a huge stash of solids!  All that un-used blue. Lots of possibilities!

Thank you to anyone who is actually still reading this, I didn't mean for it to turn into such a book! I don't know if I would even read a post this long, so I don't blame you if you just skimmed through to look at the pictures!! :D

Another big thank you to Angela, from Cut To Pieces, for organizing this quilt-a-long.  It really is an amazing quilt. :)

P.S. We've been watering our garden like crazy because of the drought - just look at this little watermelon! Oh my gosh it's so cute!!!


What is better than a little watermelon? A BABY watermelon! Ahhh!! Things in miniature are always adorable.

Sunday, July 15, 2012

New Fabric, New Quilt


I received a very large box of fabric this past Thursday - ahh!! Exciting! I think you all know the feeling. :) I wanted to start working with it right away, but we had visitors stay with us over the weekend, so I didn't get to do anything until today. It was so hard to wait!! Lol.


I have quite a few WIPs going on right now, so I didn't really need to start anything new.. but the lure of new fabrics sucked me in! I sewed some improvisationalish blocks today. My plan was that I knew I wanted to use the new fabric, and I wanted it to be a rectangular "half log cabin".  I'm sure this block exists, and has a real name, but I don't know what it is, so I'm going with half a log cabin. I sewed four blocks, without measuring the strips. The only thing I know for sure is that I'll have 24 blocks measuring 12"x16", to make a quilt that is 64"x72".


I started to realize that I accidentally created a color scheme that I really liked! The first two blocks shown above have purple, orange, grey and an aqua color.

I can't decide if I should go for a scrappy look, and use all the fabrics, including my stash - or go with a dedicated color scheme. I pulled some fabrics and I think they look really good together, but I really love the scrappy look as well!


Decisions, decisions.. :)

Monday, July 2, 2012

Paper Piecing with a Squirrel


Yesterday, Beth from Plum and June, mentioned in her June wrap up post that she wanted to try paper piecing. I left her a comment saying that I had also been wanting to try this for a while now - and she suggested we make a pact to both try it this month. I said, sure, why not? Then I got really curious and started googling tutorials and trying to figure out how to do it. Sometimes you just need someone to give you a little push. Thank you, Beth! :)

A few weeks ago I started thinking about tangrams. During one of my first industrial design classes freshman year, we were given an exercise that involved tangrams. So what's a tangram? Straight from wikipedia:  

"A tangram is a dissection puzzle consisting of seven flat shapes, called tans, which are put together to form shapes. The objective of the puzzle is to form a specific shape (given only an outline or silhouette) using all seven pieces, which may not overlap. It was originally invented in China at some unknown point in history, and then carried over to Europe by trading ships in the early 19th century. It became very popular in Europe for a time then, and then again during World War I. It is one of the most popular dissection puzzles in the world."


The reason this came to my mind regarding quilting is that you can depict thousands of objects using just these basic geometric shapes - shapes that would be easy to sew together!

I thought using the shapes in the tangram would be the perfect way to explore paper piecing. I decided to use the theme of animals. There are lots of examples of tangram animals out there to choose from. (But hold up for a second - those two words next to each other are impossible to think or say without mashing them together - "tangranimals", so that's what they are now, lol.)  Here are just a few of the ones I found:


My goal is to piece two blocks per week, to end up with a quilt that has sixteen total blocks.  I will be posting every week on my progress, along with the templates I design for the blocks if you feel so inclined to make some animals yourself! :) It would make a great baby/kids quilt!

First things first - if you've never paper pieced before, here are some GREAT tutorials and tips that really helped me figure this all out. I would do a tutorial myself, but I promise it wouldn't be as good as these ones:
  • This video, from The Crafty Gemini, explains paper piecing with a really simple, basic block. It's really easy to follow.
  • This video, from Karen Johnson, of Connecting Threads, shows a more complicated block and offers up more advanced tips.
  • Here is a great blog post, from Fresh Lemon Quilts.
  • This article, by Janet Wickell, on About.com, has a great list of general tips to reference when paper piecing. 
Here are my own personal tips:
  • Sew with a shortened stitch length - I went with 1.2
  • Use really big, over-sized pieces of fabric! Don't skimp out, because wasting fabric isn't as bad as using the seam ripper
  • GO SLOW - you don't want to have to use a seam ripper on those tiny little stitches. It'll probably happen though. It took me FOUR tries, starting over from scratch, to make this block!
  • Before you stitch a seam, pretend it's already been sewn and fold it over along the pretend seam line. Does everything look right? Or did you almost just sew the piece on backwards? It's easy to do! :P
  • If you ever make your own paper piecing design, remember that whatever you sew will be a mirror image of the template you are using!
Okay, so you got it right? On to Block One!

I should mention that these blocks won't be true tangrams, because I had to modify the outlines of the shapes in order to make this work for paper piecing. In paper piecing, it's very important to have a plan, and to sew things in a specific order, otherwise you might end up at an intersection of seams that just won't work!

I broke this block up into four smaller blocks - it's the only way I could figure out how to make it work, and I think it makes it easy because each block only has a few pieces. The final block will be just under 6" square. I added borders to make my finished block 10" square.


Download the pdf of this block here.

Step one: Figure out how to paper piece (LOL, do ya like that?)
Step two: Download the pdf of this block here. Print out the template at 100% scale (ie do not scale or fit to page)
Step three: Cut the blocks out - just be sure to leave some white space around each block
Step four: Paper piece each block individually, starting with 1 and following the numbers in order
Step five: Trim the blocks down - leave 1/4" around the entire block
Step six: Sew blocks A and B together
Step seven: Sew blocks C and D together
Step eight: Sew the two sections you just made together to create the final block
Optional: Sew a border of pretty fabric around your finished block!

That sounds like a lot of steps, but once you "get it", (and like I said, it took me four times!) it should go pretty quick. I hope it went well for ya! :)

A little disclaimer: This is my very first time paper piecing. My plans might not be perfect, and there may be easier ways to do things. If you see something that's wrong or have a suggestion - please let me know! I'd love to hear from you!

From now on I will post two blocks in each post, but I don't want to overwhelm you guys today - this post is long enough as it is! lol! I'll be back later this week with Block Two: Pig! At least, it's supposed to be a pig - it's a little ambiguous. Hehe. :P


Thanks for sticking with me for such a LOOOONG post! :D Hope you had a great Monday!

Linked to Fabric Tuesdays!

Monday, May 21, 2012

Wonky square ring block

Yesterday was a seriously lazy day. I've been a bit under the weather, so I did a lot of laying around, I drank some red wine (I know, I'm bad!) and watched Game of Thrones. :) How was your Sunday?

As you can see, I picked a design (!!!) for my red and blue fabric squares I cut out of the quilt top I found. I knew I wanted little rectangles, so it was just a matter of how I would piece them together. I'm sure this block exists somewhere out in quilterspace, but I did a quick look around and couldn't find anything, otherwise I'd link up some photos of what this might look like as a finished quilt.

It's pretty darn self explanatory so I'll just quickly show ya what I'm doing..

I'm planning on a 56" x 56" square quilt. That'll be 16 blocks (4x4 arrangement) and each finsihed block will be 14" square.
I cut up 2" x 3" (approximately) rectangles, and I'll need about 30-35 per block.
I started with a white block, which I purposefully cut wonky. I figure the blocks will range from 4" to 6" in any dimension, and I'm hoping to make them all different. Then I planned to sew a row of rectangles together and attach it to one of the sides of the white square.
Here is where I got myself into trouble! For whatever reason, the beans knocking around in my brain wanted the block to look like figure "A" above. Looking back I don't know why, I just thought it made sense! I should have realized that figure "B" above makes much more sense, is way easier to sew, and would be the obvious choice for anyone with correctly functioning beans in their brain.

Can you think of a magical (ie easy!) way of making block A?
I sewed my first block (above) the dumb way and it just made things much harder on myself, because I had to match up the seam to make it appear that the blocks on the top went all the way across.
It looks nice, but not worth the extra work. The second block I did (the block shown at the very top of the post) I made the easier way, and I think it looks just as nice. It's a really quick block to make, too!
Isn't it fun taking pictures outside on a windy day! LOL I'm just glad none of the neighbors were outside!

Edit! [Wednesday May 23rd]
I'd like to link this up to Lee's website, Freshly Pieced, as a "Work in Progress." Since I bought some new fabric for the quilt and made a new block, I thought I'd add some more pics:

I want to keep this quilt as low-budget as possible, and use all of the red and blue from the original quilt top I cut up. When I did some quilty math, I figured there wasn't enough fabric, so I bought 6" of each of these prints. It ended up being $12.00, hooray! I think they will mix nicely with what I already have. Just 13 blocks to go! :P
Thank you so much for taking the time to stop by and check up on what I'm doing! :)