Showing posts with label wonky. Show all posts

Monday, June 25, 2012

Wonky Square Rings Quilt Complete!


Wonky Square Rings is complete! HIP HOP HOORAY! :D * confetti * (Picture onslaught ahead!)


I should call this my “learning” quilt. I feel like what I've learned while making this quilt is worth more than the finished product itself!

 
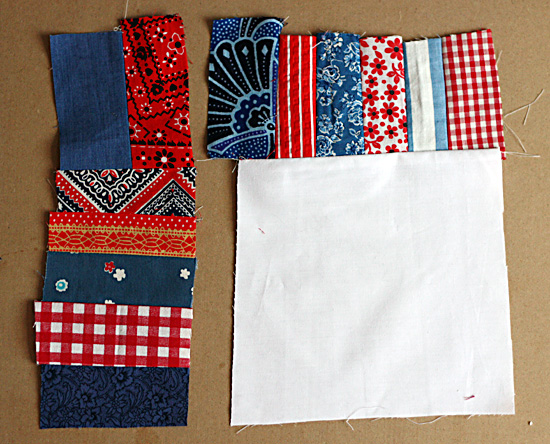
This quilt started as a way to save some money, because the fabrics I started with for this were from a quilt top I purchased for a few dollars in an antique store.


The block design came out of a need to sew, to sew anything, to just sit down at my machine and put fabrics together with thread. Eventually all of the blocks were completed and the top was finished.


In this post I talked about how I realized I didn't like all that white (the finished product may have changed my mind - I'm on the fence now!). I talked about not buying cheap fabrics just because what I really wanted was out of stock. If you read through the comments section, you'll see I got some great feedback from you guys! Thank you! That was some of the best feedback I've gotten from a blog post. Really cool! :)

 
You might have noticed that I went ahead and did the quilting like I had planned – straight lines with turns intersecting each other. I love quilting this way. My brain really took to this method fast – I thought it was much easier than stippling/meandering. My brain gets really confused when I stipple – I feel like a crazy person! My hands go one way and my brain wants to go another. With this straight line intersecting method I knew exactly where to go, no weird miscommunication going on in my body, lol. 


The biggest tip I have for someone who wants to give this quilting method a shot is to slow down, actually almost stop, when you come to a turning point. At first this will seem awkward, but after a while (5 or 10 minutes) it comes naturally, you just do it and barely even think about it.

By the way, anyone want to take a guess at how many calories quilting burns?? I don't know the answer, but judging by the way I felt it's significant! I was getting sweaty in areas that shouldn't have been getting sweaty, LOL. Yikes..


I had my doubts about this quilt until the quilting was done and the binding was on. I think those two things really made the quilt come together. But I think I say that with every quilt I make!

One more thing I learned? Make my quilts bigger!! I keep thinking 50”-60” is enough, but it's not. I really like to lay on the couch and have lots of quilt on me and my fiance. :)


Speaking of my fiance... we went for a cruise down to Lake Michigan – it's about a 10 minute drive from our home. He stopped and held my quilt for the photos and then we kept going until we got to this little tiny beach at the end of the road...


And we watched the sunset. :) (Yes, this is a terrible sunset picture, but you get the idea, hehe.)
 

Thank you guys so much for all your input along the way - it's always interesting to hear what tips you guys have and the encouragement makes the process so much fun. :)

I'm going to link up with Canoe Ridge Creations for Sew Modern Monday.Thank you for coming over!

Wednesday, June 20, 2012

WIP Wednesday, Quilt Top Complete!


 WIP #1: Party time! Checkit. It's a finished quilt top! Man, that feels good. :)


Here are some things I learned while making this quilt.

1. I don't like white backgrounds as much as I thought. Something about all the white space bothers me. I think that's why I like patchwork so much, it fills in all the space with color! I wish I could go back and use a greige (gray/brown) color instead. I think it would warm up the quilt, and make me feel better about snuggling under it with a glass of red wine. (This is a very important and practical consideration!)

2. I really wish I had used a "design wall". I laid the blocks out for this quilt on the floor, and I thought they looked good. When I see the quilt held up I realize some of the blocks would have looked better in a different orientation. I think you might get a better (or at least different) perspective viewing the quilt on a wall, because you can look at it as a whole, straight on. I have the room for a design wall, I guess I better get to work!

3. Buy good fabric. I bought a cheaper kind of white fabric than usual (I usually get the Kaufmann stuff from JoAnn's, but they were out so I just grabbed something). If you look closely (below), the fabric puckers along the seams with white fabric. :( I didn't experience the puckering with the prints, or any other time I've sewn, so I can only assume it's the cheap fabric?? The only other thing I can think of is that I really need a new iron. My iron is really large and heavy, and doesn't work very well without steam. But if I do use steam it steams like craaaazy. That might have caused the cheaper (thinner) fabric to wrinkle like that. Anyone have any suggestions for a new iron?

4. Learn how to use my friggin DSLR camera already. I bought it, I kind of know how to use it, but my pictures are always really blurry and I have to fix them in editing. Not good. I have a Canon Rebel Xsi. If anyone has any tips on photographing quilts with that guy, (ie settings) I'd love to listen! :D

5. (Phew, I sure learned a lot on this one!) I need to figure out a better way to photograph my quilts. I don't always have someone to hold them up for me, so I am going to do some brainstorming on how I could hang them.


Now I just have to decide how to quilt it. I have an idea, I just have to figure out how to do it! I am having trouble finding an example of it, or a tutorial. I've seen it on one (or more) of the really big modern quilting blogs. It looks like this:


It's just random lines with turns that cross each other. I'm thinking I'll just have to do some practicing.  Has anyone tried something like this?


WIP #2: EZ Dresden Challenge
Not much progress on this one. I'll be tackling the rest of this guy in the upcoming week.


WIP #3: What's next? I am thinking I am going to need to make a quilt using 100% of what is in my stash. My quilting "budget" has taken a little bit of a hit lately! But ya never know.. :P

I'm linking up to Freshly Pieced, hosted this week by Amy, from Sukie, Don't You Know Who I am?  I'll be stoppin in to as many blogs as I can to see what you are up to! Thanks for stopping by! :)

Tuesday, June 5, 2012

Wonky block update and a Dresden beginning

For the first time, maybe in ever, I have two WIPs!

In the past, I've made quilts like I read books - start at the beginning, read all the way through, move on to the next book. (Unless the book sucks, then I'll just toss it aside. I'm not one of those people that will punish themselves and read to the end no matter how bad it is!) Right now I have two quilts going on because I finally decided what to do with my Poetica fabric and I'm really excited to see it come to life!

WIP #1 Wonky Square Ring Blocks


I thought it'd be cool to give this quilt a twist by adding one just-red block. Like a cherry on top.


I have 7 blocks out of 16 done - almost halfway there! I really should have made more progress on this quilt, but the weather was too nice this past weekend to stay inside very much. What's interesting about these blocks is that each one takes almost exactly half an hour, so I like to turn on HGTV and listen to one episode of a house hunting show while I sew. Works out well!

WIP #2 Dresden beginnings...


I made an Amazon purchase (it was $25.10 - just enough for the super saver, yeaah!). I've been following the EZ Dresden challenge blog hop, and I am so inspired I've decided to participate. The template was 7 bucks, and well.. something else on my Amazon wish list just happened to be $18, sooo... what was I to do?! lol The numbers were aligned, can't mess with fate. :D I'm really excited to get the Quilting Modern book in my hands!

I went to JoAnns and bought some coordinating solids to go with my Poetica prints. I love looking at them! They are so juicy together all on their own I'm half tempted to complete the quilt solely with the solids!


Here are all the fabrics together..

(I do not know what green I ended up buying, hence the mystery.)

Okay, here is what I am thinking... what if.. (p.s. it's too late for what if's, I've already started!) I made a GIANT log cabin block... like this (though it isn't nearly big enough yet)..


Then, what if I used the Dresden template to cut the giant block into 20 wedges, and then cut those wedges into thirds. Then (are you following me? lol) what if I were to sew those pieces back together into rows using Kona Coal as my background/separator fabric.


This is what I am thinking. I really like it, but it doesn't look very Dresdeny, does it? I am not even 100% convinced this is all going to work out... but I will just go ahead and see where it takes me. :)

A tidbit about me and a question! I'm an industrial designer for a living so I know CAD programs inside and out. I use them (Solidworks if I'm at work playing around on lunch, Draftsight, which is free, at home) for laying out quilting ideas - it makes it so I don't have to think about the math! Is there some kind of software that quilters commonly use? I'm curious to know how people plan out their designs.

So that's what's going on this week. As a side note.. I thought I'd say thank you to Therese, from Birdie & Maryse for the fabric she sent me and the sweet little card... I won her Sew Mama Sew giveaway, and I'm really happy to have these cute fabrics added to my stash!

Today I'm going to link with Heather and Megan from Quilt Story. Tomorrow I'll be linking with Lee, for WIP Wednesdays, as usual. :)

Thanks for taking the time to stop by!

Monday, May 21, 2012

Wonky square ring block

Yesterday was a seriously lazy day. I've been a bit under the weather, so I did a lot of laying around, I drank some red wine (I know, I'm bad!) and watched Game of Thrones. :) How was your Sunday?

As you can see, I picked a design (!!!) for my red and blue fabric squares I cut out of the quilt top I found. I knew I wanted little rectangles, so it was just a matter of how I would piece them together. I'm sure this block exists somewhere out in quilterspace, but I did a quick look around and couldn't find anything, otherwise I'd link up some photos of what this might look like as a finished quilt.

It's pretty darn self explanatory so I'll just quickly show ya what I'm doing..

I'm planning on a 56" x 56" square quilt. That'll be 16 blocks (4x4 arrangement) and each finsihed block will be 14" square.
I cut up 2" x 3" (approximately) rectangles, and I'll need about 30-35 per block.
I started with a white block, which I purposefully cut wonky. I figure the blocks will range from 4" to 6" in any dimension, and I'm hoping to make them all different. Then I planned to sew a row of rectangles together and attach it to one of the sides of the white square.
Here is where I got myself into trouble! For whatever reason, the beans knocking around in my brain wanted the block to look like figure "A" above. Looking back I don't know why, I just thought it made sense! I should have realized that figure "B" above makes much more sense, is way easier to sew, and would be the obvious choice for anyone with correctly functioning beans in their brain.

Can you think of a magical (ie easy!) way of making block A?
I sewed my first block (above) the dumb way and it just made things much harder on myself, because I had to match up the seam to make it appear that the blocks on the top went all the way across.
It looks nice, but not worth the extra work. The second block I did (the block shown at the very top of the post) I made the easier way, and I think it looks just as nice. It's a really quick block to make, too!
Isn't it fun taking pictures outside on a windy day! LOL I'm just glad none of the neighbors were outside!

Edit! [Wednesday May 23rd]
I'd like to link this up to Lee's website, Freshly Pieced, as a "Work in Progress." Since I bought some new fabric for the quilt and made a new block, I thought I'd add some more pics:

I want to keep this quilt as low-budget as possible, and use all of the red and blue from the original quilt top I cut up. When I did some quilty math, I figured there wasn't enough fabric, so I bought 6" of each of these prints. It ended up being $12.00, hooray! I think they will mix nicely with what I already have. Just 13 blocks to go! :P
Thank you so much for taking the time to stop by and check up on what I'm doing! :)