Showing posts with label tutorial. Show all posts

Thursday, September 6, 2012

Allow me to acquaintmyself!

Plum and June

Hey guys! Welcome to my day on the hop, hosted by the lovely Beth from Plum and June. Tessa, from The Sewing Chick, is also featured today, so click over there too!

I want to thank Beth for putting this hop together - I think most of my followers are fellow hoppers! So many of you may already know me, but for those of you who don't...


My name is Bethany, I'm 30, and I live in Michigan with my fiance and our two cats. I work full time as an industrial designer. If I'm not quilting, I'm probably reading, gardening or hanging out with my fiance. I am a total introvert, so sewing is a good hobby for me... :)

I've been sewing for a couple years, and quilting for about a year. I'm still learning with every quilt I make, but I think I'm slowly getting better. Lately I haven't had as much any time to sew, because I'm gettting married very soon - September 15th! I/we put all of the planning off until June, if that gives you a little insight to my personality. ;) Needless to say, we are scrambling to nail down all the details, and sewing has taken a back seat! 

Blog hopper topics

Quilting tips: Pfsshh! I have none. Fail. :) I will tell you something that has made my life easier though. I keep a funnel and a large container of water in my craft room so I can fill my iron up on the fly and not have to walk all the way to the bathroom! Laziness or masterful planning skills.. take your pick. ;)
Blogging tips: I haven't been blogging long enough to give out tips, but something that I've noticed is that you will get as much out of your blog as you put into it. Taking the extra time to email someone or comment on their blog builds relationships (and gains followers!).
Favorite fabric: My favorite fabrics in my stash have come from thrift and antique stores. I love having something unique!
Favorite craft book: When I first learned how to sew, I had a lot of fun with the book, One Yard Wonders. When I first learned to quilt, The Practical Guide to Patchwork was my go-to reference! (Big surprise there, huh?!)
Favorite book: No way can I pick one! I LOVE reading. My favorite genres are science fiction and young adult. Some favorites (of all genres) include.. The Knife of Never Letting Go (Patrick Ness, 3 book series), The Book Thief (MarKus Zusak), Gone With the Wind, 1984, and of course, Harry Potter.
Favorite children's book: Hmm, I remember reading a lot of Boxcar Children, Babysitter's Club, Road Dahl, Mrs. Piggle-Wiggle, Sideways Stories from Wayside High, off the top of my head!
Favorite quilting tool: Recently I discovered this little bar that attaches to my walking foot to help me sew parallel lines - I never knew what it was for! But if I really had to pick a favorite quilting tool, it would be my free motion foot, because I love fmq. :)
Favorite music to listen to while quilting: My favorite type of music is electronic, and I think you could consider it a "hobby" or at least a passion. My first CD was FatboySlim's Better Living Through Chemistry (1996) and ever since then I've been addicted to the crazy sounds of techno. I love going to concerts and festivals (like the Detroit Electronic Music Festival) and listening to my very talented friend create live mixes. I always feel embarrassed admitting it because it's kind of weird, but what can I say. :P 
If I'm not listening to music I have Harry Potter audiobooks on, or podcasts. I listen to a wide variety of podcasts, including many on quilting!
Favorite TV show while hand stitching: So many! Favorites of all time include Felicity (oh Ben, swoon!), Road To Avonlea (probably a lot of my Canadian readers know of this one!), Downton Abbey, and if I'm feeling lazy I'll throw on HGTV. :) I just finished watching the "Battlestar Galactica" series and I really liked it. I've got to choose a new show to watch now, maybe Dr. Who!
Binding - by hand or by machine?: Always by machine, unless it's a gift.
If I'd only known - what you wish you knew about blogging before you started your blog: Before I was blogging, I was reading a lot of blogs, so I can't really say anything surprised me, aside from how friendly everyone is.

Tute time! (heh)
I have a confession to make. :/ I really rushed this project, and it shows. If I had time I would make a second one, with all the improvements, but until September 15th free time is sparse. (And if anyone is wondering, my sister isn't getting her birthday quilt in time! LOL)

I wanted to make a travel makeup case, similar to an expensive one I saw in a gift shop this summer, by a designer well known for her colorful prints and quilted texture.

 Oh my grossness, that binding is an atrocity.


Here are my disclaimers before I get to the step-by-step instructions guidelines:
  • I used 9" zippers, but that is the only measurement I knew of while I was making this.
  • There is no way to close it. #embarrassing I just didn't get that far. My plan is to eventually sew a tie to the bottom of the bag so that when it's closed I slip the tie through the loop and knot it.
  • I used pre-packaged binding from JoAnns. I said it, and it's true. :-O
Here we go..
 1. Cut a front piece of fabric, a back piece of fabric, and the batting piece for the middle. I started with slightly larger than 9" (for the 9" zippers), and about 22ish inches long. Baste and quilt as desired.
2. Trim it down to 9" wide by 20" long.
3. Optional. Trace a round object onto two of the corners and cut them out.
4. Optional. Sew a little hook to the short end with the rounded corners, if you think it will come in handy for hanging it up or using this loop as part of the system that will keep this shut.
(Other options to keep the case shut would be buttons, velcro, snaps, another zipper, etc...)
5. This is where it gets a bit murky.. You will need to cut two rectangular pieces of fabric to sew to the zipper, for each pocket you want. I went with two pockets, so I did this twice. The finished pocket dimension is 6" by 9". Fold the fabric over on the top and bottom edges and sew it directly to the main, quilted piece of fabric.
6. This is possibly the worst picture I've ever put on my blog. :P If you'd like to have an area for makeup brushes, you'll need a back piece of fabric and a front piece of fabric. I also included a "flap" to keep the brushes from falling out.

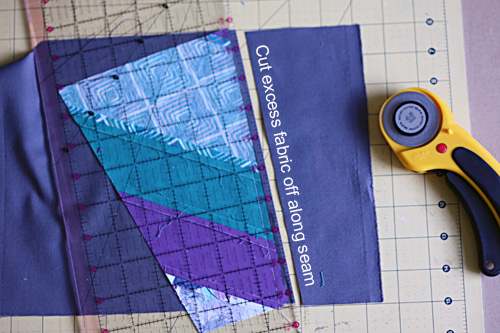
When you have the zippered pockets sewn in, and the brush holder area pinned in, you just have to bind the edges all around, which fix everything in place. Hopefully if you are actually using this tutorial it wasn't completely useless! :D

I leave you with my very pooped looking cat.

Thank you for visiting! And thanks again to Beth!

Thursday, August 23, 2012

Chained 5 Patch Block


I could fill a really long post with a smorgasbord of things that have been going on life-wise lately! Quilting-wise, eh, not so much. It's been a bit slow around here, but I did get a new 1/4" piecing foot and two new quilting books, so that's... somethin... :P

I got the new quilting foot because the old one I had seemed like it wasn't made very well and the guide shook quite a bit, making it not perfectly accurate. It also liked to fold back my fabric, instead of letting it feed through smoothly. The new foot works much better, which will be really helpful in making this quilt for my sister's birthday! (She doesn't read my blog. :) )


I found the block, and tutorial on the Quilter's Cache. I had a lot of fun time going through their collection! I would suggest using their tutorial for this block (duh, lol - I hope this post doesn't come off as a tutorial of a tutorial), as it was pretty easy to follow, but I thought showing you guys photographs might be helpful while going though it. Their tutorial has some computer/graphic images, and text, but for me real photographs are always a big plus! So here we go!


Cutting
 Color 1:

Color 2:

Color 3:

Color 4: (Eventually you will cut this 18" strip into smaller pieces.)

Sewing
Step 1: Sew the following blocks together, and then slice it in half.

Step 2: Now sew these blocks together, and slice it in half.

Step 3: Sew these blocks together, slice again!

Step 4: Cut your 18" strip into the following sizes:

Step 5: Now you only have a few pieces left - sew them together as shown below on the left. Grab your pieces from step 3 and sew them together with the strip below. The resulting block will need two white (color 4) 2.5"x5" pieces sewn to the top and bottom.


Arrange your strips as shown in the block layout and you're done! Hopefully that made sense and was easy to follow - like I said, I just wanted to show you guys photos of what I did. I'm not the greatest at explaining things, so I'd definitely refer to the original tutorial. :)

Umm, yea - so I'm a nerd (aren't we all? I mean, c'mon, we have quilting blogs, hehe), and a bit obsessive about making sure this quilt will look really nice for my sister, so I laid out a section of it in photoshop. (Hey, I gotta do something on my lunch break!) I wanted to be sure I was going to like the colors/arrangement. It's not completely accurate, but it helped me make the decision to use brown as the "anchor" color.


I need to make six blocks a week to finish it in time for her birthday! I think I can, I think I can!!


Well guys, I've got a lot of crap going on for the next 3-4 weeks - lots of travel and wedding prep! I sort of saved everything until the last minute, that's just how I be. I'm going to try to squeeze in sewing time wherever I can to take my mind off veils, music selections, decorations, portapotty's (we are so classy) and all that craziness. Thanks for stickin with me while I'm a bit blog-absent! :D

PS AQS in Grand Rapids this weekend! I'm going on Saturday!! Is anyone going?

PSS EZ Dresden deadline is a week away! All I have left is the binding! :) :) Double smileys.

Monday, July 2, 2012

Paper Piecing with a Squirrel


Yesterday, Beth from Plum and June, mentioned in her June wrap up post that she wanted to try paper piecing. I left her a comment saying that I had also been wanting to try this for a while now - and she suggested we make a pact to both try it this month. I said, sure, why not? Then I got really curious and started googling tutorials and trying to figure out how to do it. Sometimes you just need someone to give you a little push. Thank you, Beth! :)

A few weeks ago I started thinking about tangrams. During one of my first industrial design classes freshman year, we were given an exercise that involved tangrams. So what's a tangram? Straight from wikipedia:  

"A tangram is a dissection puzzle consisting of seven flat shapes, called tans, which are put together to form shapes. The objective of the puzzle is to form a specific shape (given only an outline or silhouette) using all seven pieces, which may not overlap. It was originally invented in China at some unknown point in history, and then carried over to Europe by trading ships in the early 19th century. It became very popular in Europe for a time then, and then again during World War I. It is one of the most popular dissection puzzles in the world."


The reason this came to my mind regarding quilting is that you can depict thousands of objects using just these basic geometric shapes - shapes that would be easy to sew together!

I thought using the shapes in the tangram would be the perfect way to explore paper piecing. I decided to use the theme of animals. There are lots of examples of tangram animals out there to choose from. (But hold up for a second - those two words next to each other are impossible to think or say without mashing them together - "tangranimals", so that's what they are now, lol.)  Here are just a few of the ones I found:


My goal is to piece two blocks per week, to end up with a quilt that has sixteen total blocks.  I will be posting every week on my progress, along with the templates I design for the blocks if you feel so inclined to make some animals yourself! :) It would make a great baby/kids quilt!

First things first - if you've never paper pieced before, here are some GREAT tutorials and tips that really helped me figure this all out. I would do a tutorial myself, but I promise it wouldn't be as good as these ones:
  • This video, from The Crafty Gemini, explains paper piecing with a really simple, basic block. It's really easy to follow.
  • This video, from Karen Johnson, of Connecting Threads, shows a more complicated block and offers up more advanced tips.
  • Here is a great blog post, from Fresh Lemon Quilts.
  • This article, by Janet Wickell, on About.com, has a great list of general tips to reference when paper piecing. 
Here are my own personal tips:
  • Sew with a shortened stitch length - I went with 1.2
  • Use really big, over-sized pieces of fabric! Don't skimp out, because wasting fabric isn't as bad as using the seam ripper
  • GO SLOW - you don't want to have to use a seam ripper on those tiny little stitches. It'll probably happen though. It took me FOUR tries, starting over from scratch, to make this block!
  • Before you stitch a seam, pretend it's already been sewn and fold it over along the pretend seam line. Does everything look right? Or did you almost just sew the piece on backwards? It's easy to do! :P
  • If you ever make your own paper piecing design, remember that whatever you sew will be a mirror image of the template you are using!
Okay, so you got it right? On to Block One!

I should mention that these blocks won't be true tangrams, because I had to modify the outlines of the shapes in order to make this work for paper piecing. In paper piecing, it's very important to have a plan, and to sew things in a specific order, otherwise you might end up at an intersection of seams that just won't work!

I broke this block up into four smaller blocks - it's the only way I could figure out how to make it work, and I think it makes it easy because each block only has a few pieces. The final block will be just under 6" square. I added borders to make my finished block 10" square.


Download the pdf of this block here.

Step one: Figure out how to paper piece (LOL, do ya like that?)
Step two: Download the pdf of this block here. Print out the template at 100% scale (ie do not scale or fit to page)
Step three: Cut the blocks out - just be sure to leave some white space around each block
Step four: Paper piece each block individually, starting with 1 and following the numbers in order
Step five: Trim the blocks down - leave 1/4" around the entire block
Step six: Sew blocks A and B together
Step seven: Sew blocks C and D together
Step eight: Sew the two sections you just made together to create the final block
Optional: Sew a border of pretty fabric around your finished block!

That sounds like a lot of steps, but once you "get it", (and like I said, it took me four times!) it should go pretty quick. I hope it went well for ya! :)

A little disclaimer: This is my very first time paper piecing. My plans might not be perfect, and there may be easier ways to do things. If you see something that's wrong or have a suggestion - please let me know! I'd love to hear from you!

From now on I will post two blocks in each post, but I don't want to overwhelm you guys today - this post is long enough as it is! lol! I'll be back later this week with Block Two: Pig! At least, it's supposed to be a pig - it's a little ambiguous. Hehe. :P


Thanks for sticking with me for such a LOOOONG post! :D Hope you had a great Monday!

Linked to Fabric Tuesdays!

Wednesday, June 13, 2012

Hey house guests, mind if I do some sewing?


Not a lot to report this week. We have had company from out of town staying with us, so I haven't had very much time to sew at all. Last night we all drank frozen margaritas and play board games. One of the categories I got during a game of "Outburst Jr." was, "things you would find in a sewing basket" - can you believe I only got 7 out of 10?! How could I forget "pincushion"? Lol - that was pretty fun. 

I managed to get one strip of my Dresden quilt done. With the exception of the pointy pieces, it was easier than I thought it would be to piece together. Sewing the points is tricky, because you want to have a 1/4" of gray after the tip, to account for the seam. It's really hard to make it exactly 1/4" - I am going to have to settle for being okay with imperfections in this quilt!


Here is how I made the strip. I cut a 9" wide section of the Kona Coal. I laid one of the blocks down (face up), being careful that the bottoms and tops of the fabrics lined up straight. Then I traced a line along one of the edges.


I flipped the block over and used the line I drew as a guide to sew along.


Finally, I trimmed along the seam and pressed it open. I'll probably end up with quite a bit of scrap of the gray - at least it's a color I'm sure I'll find good use for!


So that's it! :) I'm a bit late for the WIP Wednesday linky with Lee @ Freshly Pieced, and I'm not sure I'll have time to visit very many blogs tonight, so I'm gonna skip out this week. I have plans tomorrow night and Friday night with our guests, but I'll have my freedom back Saturday, so maybe I'll make some good progress over the weekend! Hope you guys are having a great week so far. :)